Great places to purchase and download new sound fonts are from KSith Saber Fonts and Kyberphonic.
Importing Sound Fonts - Neo CFX Saber
Notice
This guide assumes that you have already downloaded a sound font that is optimized for your Neo CFX Saber.
Step 1
Remove the microSD card from your saber and connect it to a computer.
In the root directory, create a new folder in the following format:
[Number]-[Sound_Font_Name_Without_Spaces]
So if you downloaded KSith's "The Light" and are installing it as your 17th font, the folder should be named:
17-THE_LIGHT
Place all of the files from the sound font you downloaded into the new folder.
Notice
Double-check that the new folder was properly named, otherwise the saber will not recognize it.
Step 2
Check that the 'font_config.txt' file is present in the new folder.
If it is missing, copy it over from another sound font folder into the new folder.
Each 'font_config.txt' file contains parameters that define that sound font's behavior when it is active.
View the pages linked below to learn more about these parameters.
View 'Advanced Color Customization' to learn more

View 'Advanced Blade Animations' to learn more
Importing Sound Fonts - Neo Proffie Saber
Notice
This guide assumes that you have already downloaded a
sound font that is optimized for your Neo Proffie Saber.
Step 1
Remove the microSD card from your saber and connect it to a computer.
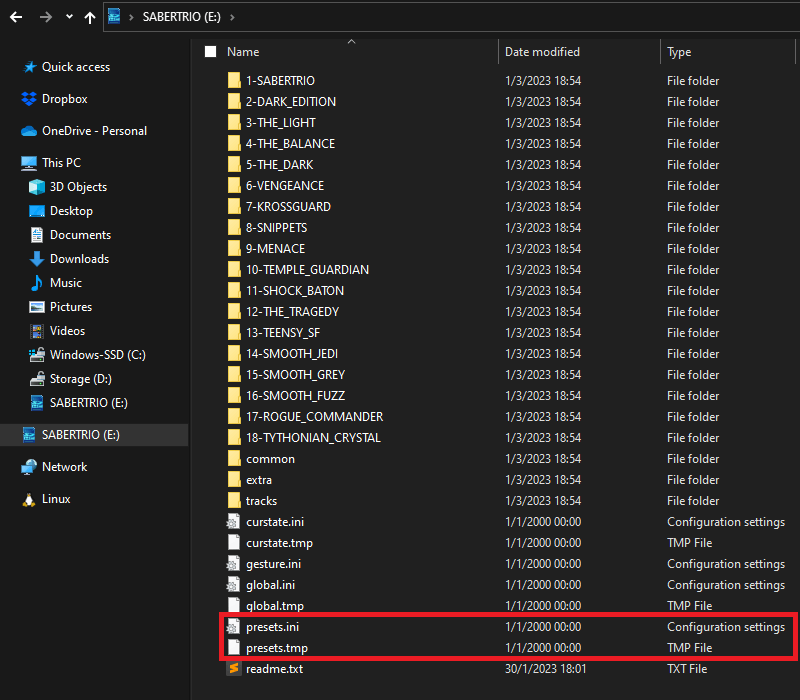
In the root directory, delete both 'presets.ini' and 'presets.tmp'
if they are present.
Notice
If these files are present before you reflash your Neo Proffie
Saber, it will not detect any newly added sound fonts.
Step 2
Copy the entire contents of your Neo Proffie Saber's microSD card and
save it locally to your computer.
Safely eject the microSD card from your computer, insert it back into the
Neo Proffie Saber's soundboard, and set it aside.
For the next few steps we will be working exclusively with the contents you
just saved locally to your computer.
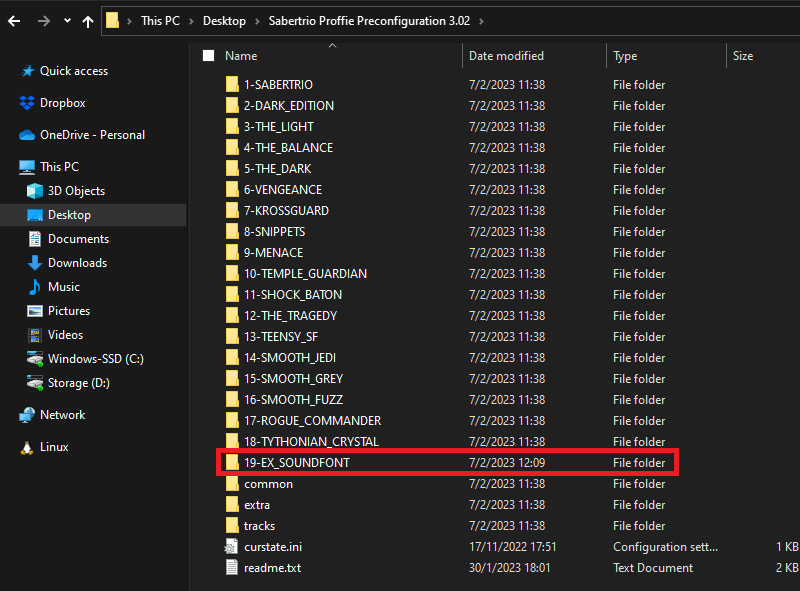
Create a new folder inside the root directory and name it in following format:
[number]-[sound_font_name_without_spaces]
For this guide, we will be naming the example sound font:
19-EX_SOUNDFONT
Step 3
Navigate to 'extra > ProffieOS > config'.
Refer to the list below to find and open the 's3config' file that matches your hilt/chassis
configuration with a code editor like Notepad++.
ProffieBoard v3.9
Power Core Chassis System
Regular Single Blade - s3config_v3.h
Korvus/Solarien (Crystal Chamber) - s3config_v3_CC.h
Krosgaard/OLED Screen - s3config_v3_Kros_OLED.h
Legacy Chassis System
Regular Single Blade - s3config_v3_Legacy.h
Korvus (Crystal Chamber) - s3config_v3_Legacy_CC.h
Krosgaard - s3config_v3_Legacy_Kros.h
OLED Screen - s3config_v3_Legacy_OLED.h
ProffieBoard v2.2
Power Core Chassis System
Regular Single Blade - s3config_v2.h
Korvus/Solarien (Crystal Chamber) - s3config_v2_CC.h
Krosgaard/OLED Screen - s3config_v2_Kros_OLED.h
Legacy Chassis System
Regular Single Blade - s3config_v2_Legacy.h
Korvus (Crystal Chamber) - s3config_v2_Legacy_CC.h
Krosgaard - s3config_v2_Legacy_Kros.h
OLED Screen - s3config_v2_Legacy_OLED.h
FX Saber
Regular Single Blade - s3config_v2_FX.h
OLED Screen - s3config_v2_FX_OLED.h
Step 4 - Blade Style
All of a Neo Proffie Saber's behaviors are hard-coded into each individual sound font,
so the easiest way to add a sound font is to copy-and-paste the code from a pre-existing one.
In the guide below, we transplant a blade style from '1-SABERTRIO' to '18-TYTHONIAN_CRYSTAL'.
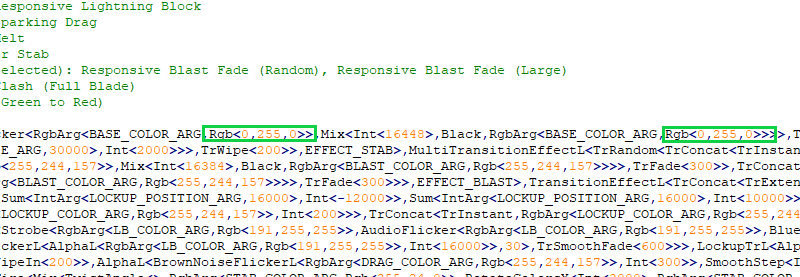
Find the code for the sound font with the blade style you would like to copy.
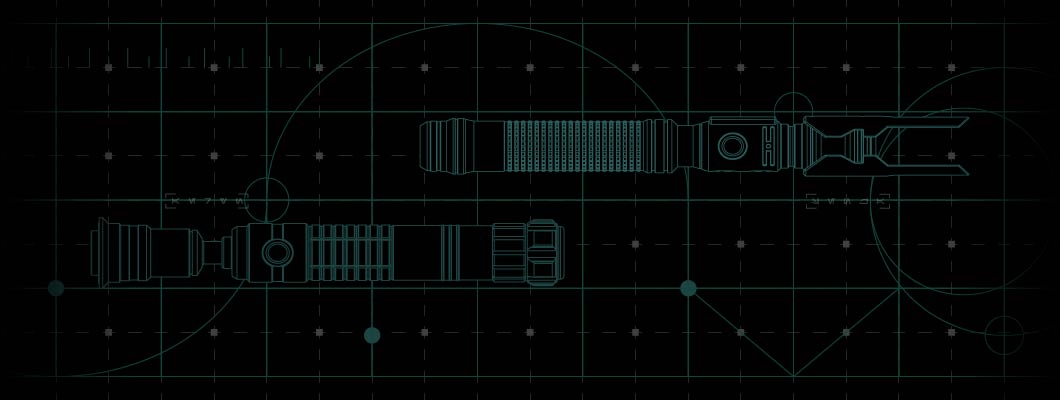
Select and copy all lines of code from “#-SOUNDFONT_NAME;common” to "StylePtr(), “Soundfont Name”},”
as shown in the example below:
If your saber is a Krosgaard, there is an additional segment of code for the quillon
blades that you will need to copy (shown below in Red).
Find the code for the sound font you would like to edit and replace
its style code with the one you copied.
Notice
If your saber is a Krosgaard, ensure that you copy over the
additional segment of code for the quillon blades.
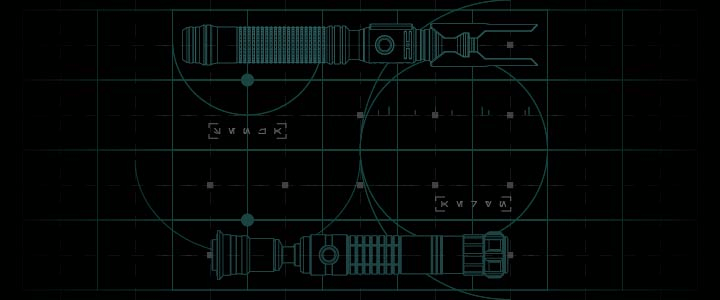
If your saber has an OLED screen, ensure that the name of the sound font at the
bottom with the quotation marks you are editing (shown below in Red)
exactly matches the name of the sound font’s folder, as this is what will appear on the OLED screen.
If your saber doesn't have an OLED screen, you can ignore this.
Notice
Names are case and punctuation sensitive, so double-check that the name of
your edited sound font is identical to the one used for that sound font's folder.
If you want to use other blade styles not natively found on your Neo Proffie Saber,
you can find a massive range of blade styles in Fett263's Style Library.
Fett263 - ProffieOS7 Style Library
Take the “1-SABERTRIO;common” (or whichever blade profile you chose)
code you copied and paste it below the code of your new sound font.
Ensure that the new blade profile is properly renamed to exactly match (case-sensitive)
the name of the new sound font's folder, otherwise your ProffieBoard will not recognize it.
Step 5 - Blade Color
The blade color is defined in the segment of code you copied in the previous step,
near the start of 'StylePtr', and you can change it using an RGB value found on
the Blade Color page in the Neo CFX Saber section.
View 'Blade Color' to learn more
To change a sound font's blade color using RGB values, you will need to write it as
Rgb<X,X,X>. For example, replace the X characters with the
RGB values of your choice as shown below.
And if your saber is a Krosgaard, there are additional code segments for the
quillon blades that need to be modified as well.
Step 6 - Preparing to Reflash
You will now need to reflash your ProffieBoard. This means that you will be
replacing the contents of your Neo Proffie Saber's microSD card with the
content you saved/edited locally on your computer.
Toggle the killswitch to OFF.
Using the provided data cable, connect one end to your saber’s USB-C port
or Micro-USB port (for Legacy Chassis System) and the other to a USB port
on your computer.
Your computer should now detect your Neo Proffie Saber. On your computer,
navigate to the 'extra > ProffieOS' folder and open the 'ProffieOS.ino' file.
Arduino IDE should automatically launch with the file loaded.
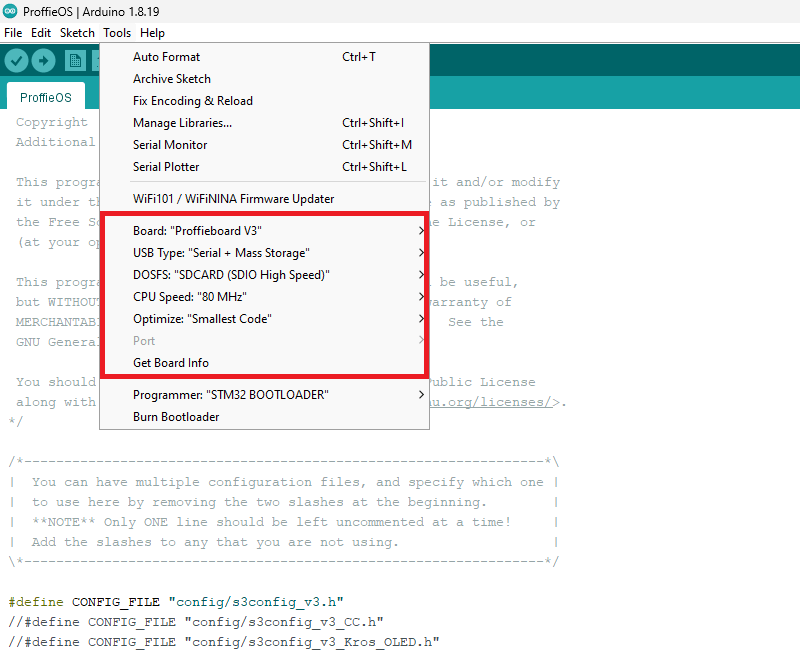
In Arduino, ensure “Serial + Mass Storage” is selected for USB Type option
in the Tools drop down menu as shown below:
For the ProffieBoard V3.9, make sure to select "SDCARD (SDIO High Speed)"
from the DOSFS option in the Tools drop down menu as shown below:
Similarly, ensure Port is selected to “COM5 (Proffieboard)” as shown below:
Notice
If the Neo Proffie Saber is in STM32BOOTLOADER mode, you do not have to select the
port when flashing the saber. The COM number may also be different.
You will need to select the appropriate config file that matches your saber hilt.
To do that, delete the "//" before the correct config file name:
ProffieBoard V3.9
Power Core Chassis System
Standard Neo Proffie Saber - #define CONFIG_FILE "config/s3config_v3.h"
Neo Proffie Saber with OLED display - #define CONFIG_FILE "config/s3config_v3_Kros_OLED.h"
Krosgaard - #define CONFIG_FILE "config/s3config_v3_Kros_OLED.h"
Korvus/Solarien - #define CONFIG_FILE "config/s3config_v3_CC.h"
Legacy Chassis System
Standard Neo Proffie Saber - #define CONFIG_FILE "config/s3config_v3_Legacy.h"
Neo Proffie Saber with OLED display - #define CONFIG_FILE "config/s3config_v3_Legacy_OLED.h"
Krosgaard - #define CONFIG_FILE "config/s3config_v3_Legacy_Kros.h"
Korvus - #define CONFIG_FILE "config/s3config_v3_Legacy_CC.h"
ProffieBoard V2.2
Power Core Chassis System
Standard Neo Proffie Saber - #define CONFIG_FILE "config/s3config_v2.h"
Neo Proffie Saber with OLED display - #define CONFIG_FILE "config/s3config_v2_Kros_OLED.h"
Krosgaard - #define CONFIG_FILE "config/s3config_v2_Kros_OLED.h"
Korvus/Solarien - #define CONFIG_FILE "config/s3config_v2_CC.h"
Legacy Chassis System
Standard Neo Proffie Saber - #define CONFIG_FILE "config/s3config_v2_Legacy.h"
Neo Proffie Saber with OLED display - #define CONFIG_FILE "config/s3config_v2_Legacy_OLED.h"
Krosgaard - #define CONFIG_FILE "config/s3config_v2_Legacy_Kros.h"
Korvus - #define CONFIG_FILE "config/s3config_v2_Legacy_CC.h"
[OPTIONAL] Reverting to Fett263's Original Button (prop) File
Open the relevant config file above with Notepad++ and look for line BELOW #ifdef CONFIG_PROP.
Add "//" before #include "../props/saber_sabertrio_buttons.h" to comment it out.
Then on the next line, delete the "//" before #include "../props/saber_fett263_buttons.h".
Step 7 - Reflashing
You are now ready to reflash your Neo Proffie Saber’s firmware.
Click the upload button shown below to begin the flashing process.
Red texts should begin showing in the lower terminal screen and eventually
a progress bar should be displayed. If the progress bar does not show, click
the upload button again.
Once the reflashing process is completed, your Neo Proffie Saber will emit a distorted sound.
This is normal and your saber now has the latest Sabertrio Proffie Preconfiguration.
Unplug the cable and toggle the killswitch to power the saber to ON.
Enjoy your updated Neo Proffie Saber! Remember to adjust the blade length parameter on your
saber if your Neo Blade is shorter than 36".
If you want to dive deeper, you can find out more through the links below.
ProffieOS Documentation - ProffieBoard Setup
The Crucible - ProffieOS - Help/Discussion Forum
Fett263 - ProffieOS7 Style Library